Proposta de arquitetura de IoT para o módulo de aquisição de dados de sensores usando o Banco de Dados REDIS e a linguagem GO – Aplicação de Teste com WebSockets e NodeMCU
Parte IV – Aplicação Teste com WebSockets
Nesta última parte do artigo vamos desenvolver uma aplicação de teste (P.O.C) de envio e recebimento dos dados de sensores com GOLANG e REDIS.
Para esse teste em particular, usaremos uma placa NodeMCU programada na IDE do Arduino. Essa placa enviará, via WebSockets, os dados de um sensor de temperatura NTC a cada 30 segundos.
A aplicação receptora em Golang irá receber os dados, parsear e armazená-los no REDIS, deixando-os disponíveis para a aplicação WEB.
Começaremos descrendo a aplicação do NodeMCU
Estação Emissora NodeMCU
Protótipo
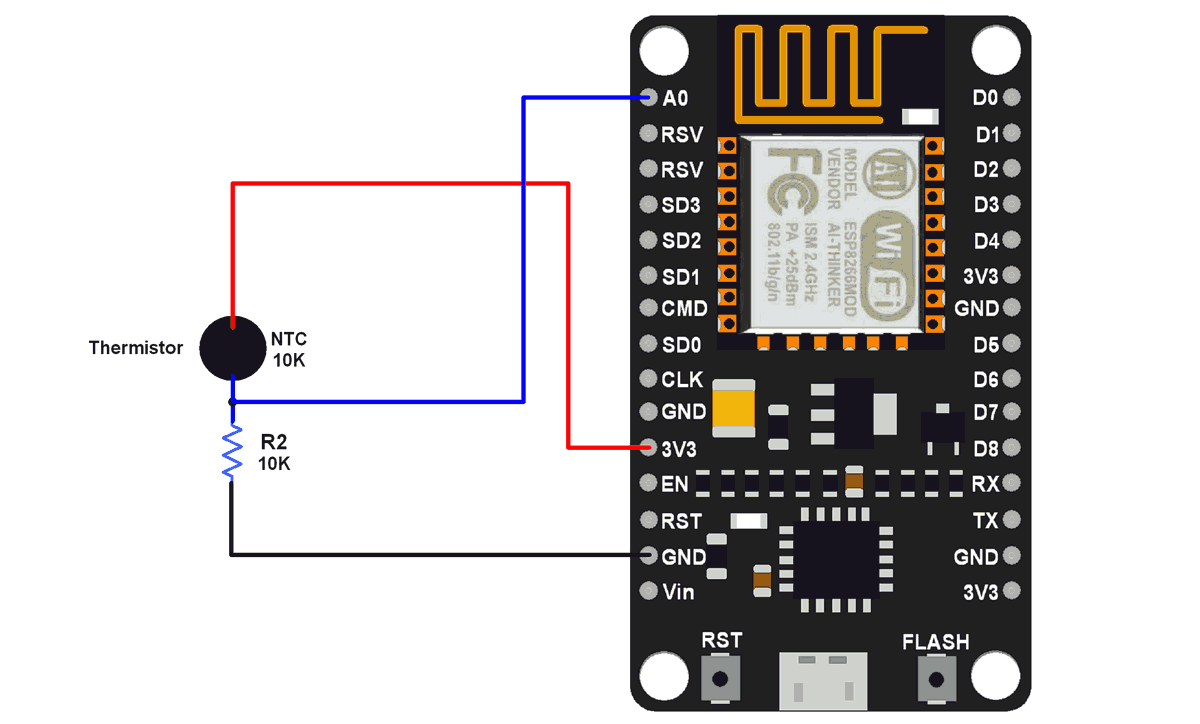
Componentes
-
- Placa NodeMCU. Na verdade pode ser qualquer placa da Familia ESP*.* compatível com a IDE do Arduino (ESP8266, NodeMCU, Wemos, ESP32, etc.)
- Sensor de temperatura do tipo termistor NTC 10K. Aqui eu utilizei um módulo termistor da GBK;
- Fios jumper e, opcionalmente, uma protoboard.
Software necessário
- Para criamos o servidor websocket vamos precisar instalar a biblioteca ArduinoWebsockets que pode ser instalada pela própria IDE do Arduino através de gerenciador de bibliotecas;
- Os dados de temperatura do sensor serão enviados a cada 10 segundos para o cliente WEB. Para descomplicar nosso código, vamos fazer a contagem do tempo com millis fazendo uso da biblioteca NeoTimer, que também está disponível no gerenciador.
- A leitura e cálculo da temperatura será feita através da seguinte rotina disponível na Internet: Thermistor Interfacing with NodeMCU
Sketch
/* ESP8266-WS_Clent.ino - Esp8266 Websockets Client 2020, by José Augusto CintraPágina InicialThis is free and unencumbered software released into the public domain. Anyone is free to copy, modify, publish, use, compile, sell, or distribute this software, either in source code form or as a compiled binary, for any purpose, commercial or non-commercial, and by any means. For more information, please refer to <http://unlicense.org/> This sketch: 1. Connects to a WiFi network 2. Connects to a Websockets server 3. Periodically sends data from a temperature sensor to the server 4. Receives return messages from the server */ // From library Manager #include <ArduinoWebsockets.h> #include <ESP8266WiFi.h> #include <neotimer.h> const char* ssid = "x"; //Enter your SSID const char* password = "y"; //Enter your Password const char* websockets_server_host = "192.168.0.0"; //Enter your server adress const uint16_t websockets_server_port = 8080; // Enter server port Neotimer mytimer = Neotimer(10000); // Intervalo de tempo para envio dos dados do sensor String tempString; String sensor = "TMP|5"; using namespace websockets; WebsocketsClient client; void setup() { Serial.begin(9600); // Connect to wifi WiFi.begin(ssid, password); // Wait some time to connect to wifi for(int i = 0; i < 10 && WiFi.status() != WL_CONNECTED; i++) { Serial.print("."); delay(1000); } // Check if connected to wifi if(WiFi.status() != WL_CONNECTED) { Serial.println("No Wifi!"); return; } Serial.println("Connected to Wifi, Connecting to server."); // try to connect to Websockets server bool connected = client.connect(websockets_server_host, websockets_server_port, "/"); if(connected) { Serial.println("Connecetd!"); //client.send("Hello Server"); } else { Serial.println("Not Connected!"); } // run callback when messages are received client.onMessage([&](WebsocketsMessage message) { Serial.print("Got Message: "); Serial.println(message.data()); }); } void loop() { // let the websockets client check for incoming messages if(client.available()) { client.poll(); } // Periodic sending of temperature sensor data to the customer if (mytimer.repeat()) { tempString = readTemperature(); Serial.println(tempString); client.send(sensor + "@" +tempString); } } // Temperature reading and calculation by the thermistor double readTemperature() { // Code extracted from the 'Thermistor Interfacing with NodeMCU' tutorial available at: // https://www.electronicwings.com/nodemcu/thermistor-interfacing-with-nodemcu const double VCC = 3.3; // NodeMCU on board 3.3v vcc const double R2 = 10000; // 10k ohm series resistor const double adc_resolution = 1023; // 10-bit adc const double A = 0.001129148; // thermistor equation parameters const double B = 0.000234125; const double C = 0.0000000876741; double Vout, Rth, temperature, adc_value; adc_value = analogRead(A0); Vout = (adc_value * VCC) / adc_resolution; Rth = (VCC * R2 / Vout) - R2; temperature = (1 / (A + (B * log(Rth)) + (C * pow((log(Rth)), 3)))); // Temperature in kelvin temperature = temperature - 273.15; // Temperature in degree celsius delay(500); return (temperature); }
Central Receptora GOLANG
Software necessário
Nos episódios anteriores já mostramos como instalar o REDIS e a linguagem GO. No entanto, para estabelecermos conexão com o REDIS e aceitarmos as conexões websockets do Node, precisaremos instalar alguns pacotes de bibliotecas:
Para instalar os pacotes, digite os seguintes comandos no terminal virtual:
<strong>go get github.com/gorilla/websocket</strong>
go get github.com/gomodule/redigo/redis
Let’s GO!
/* WS-redis.GO - Golang Websockets Server with REDIS integration 2020, by José Augusto CintraPágina InicialThis is free and unencumbered software released into the public domain. Anyone is free to copy, modify, publish, use, compile, sell, or distribute this software, either in source code form or as a compiled binary, for any purpose, commercial or non-commercial, and by any means. For more information, please refer to <http://unlicense.org/> This routine: 1. Starts a Websockets server 3. Waits for client messages with sensor data 4. Parses the data received 5. Stores data in a REDIS database */ package main import ( "fmt" "strconv" "strings" "time" "log" "github.com/gomodule/redigo/redis" "github.com/gorilla/websocket" "net/http" ) // HTTP request handler var upgrader = websocket.Upgrader{ ReadBufferSize: 1024, WriteBufferSize: 1024, CheckOrigin: func(r *http.Request) bool { return true }, } func main() { // Starts the server connection http.HandleFunc("/", handler) http.ListenAndServe(":8080", nil) } func handler(writer http.ResponseWriter, request *http.Request) { socket, err := upgrader.Upgrade(writer, request, nil) if err != nil { fmt.Println(err) } for { // reading the message received via Websocket msgType, msg, err := socket.ReadMessage() // Dados recebido do sensor if err != nil { fmt.Println(err) return } // Tratar a mensagem recebida var msg_split []string = strings.Split(string(msg), "@") // Splitted data currentTime := strconv.FormatInt(time.Now().Unix(), 10) // Current date and time key := msg_split[0] // Key to the linked list on Redis value := currentTime + "|" + msg_split[1] // Value to the linked list on Redis // Send the data to REDIS conn, err := redis.Dial("tcp", "localhost:6379") if err != nil { log.Fatal(err) } defer conn.Close() _, err = conn.Do("RPUSH", key, value) if err != nil { log.Fatal(err) } // Optional: Returning the received message back to the customer err = socket.WriteMessage(msgType, msg) if err != nil { fmt.Println(err) return } } }
Conclusão
A combinação da linguagem GO e o banco de dados REDIS permite escrever aplicações robustas, escaláveis e com excelente desempenho, tornando-as ideais para o mundo IoT.
O código de exemplo aqui mostrado é de caráter didático. Essa aplicação pode ser melhorada em vários aspectos:
-
- Criptografia recursos de segurança;
- Concorrência através das GO routines;
- Modularidade;
- Etc
Em uma próxima oportunidade mostraremos aqui como desenvolver a aplicação WEB de controle e monitoramento.
Vou estudar e implementar conforme sua sujestão ….
Obrigado